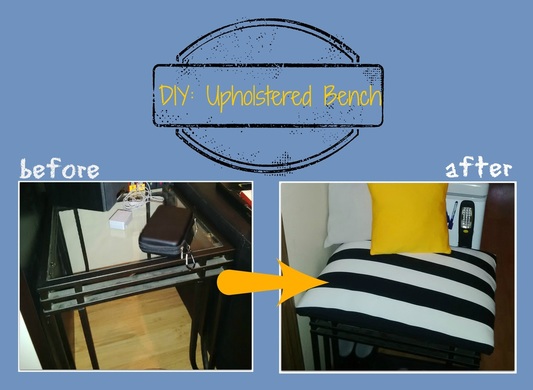
I have made upholstered seats and re-upholstered existing seats, but something about these out-dated glass side tables made me want to have a go at making an upholstered bench from a metal table frame alone.
And guess what? It was super easy!
And guess what? It was super easy!
Materials
Methods
1. Measure out the top/frame of the table and determine how much of a lip you want your upholstered top to have. For mine, the measurements were 18in x 22in and I made my upholstered top at roughly 24in x 28in.
2. Cut your wood slats/planks or plywood sheet to your determined size from Step 1. If you are using wood slats/planks, attach them together using wood glue and screws. Get a cushion slightly larger that this size or cut your padding to slightly larger than this size. Repeat with your fabric, again slightly larger than the cushion/padding size.
Note: If you have just a table frame (no top), then you will need to add pieces to your upholstered top to act as markers or braces to keep the upholstered top from sliding around. I used these additional pieces to attach my slats together from the bottom rather than using a jig to attach the boards side-by-side with screws. If you are using a flat-topped table, you can likely also do the same by attaching additional strips across the top, but if your cushioning isn't plush enough you make feel the additional pieces underneath you.
- A low-height flat-topped wooden table OR table frame
- Cushion or padding
- Fabric
- Fabric Scissors
- Staple gun with staples
- Wood planks/slats or plywood
- Drill
- Wood screws & wood glue
- *Optional: batting
Methods
1. Measure out the top/frame of the table and determine how much of a lip you want your upholstered top to have. For mine, the measurements were 18in x 22in and I made my upholstered top at roughly 24in x 28in.
2. Cut your wood slats/planks or plywood sheet to your determined size from Step 1. If you are using wood slats/planks, attach them together using wood glue and screws. Get a cushion slightly larger that this size or cut your padding to slightly larger than this size. Repeat with your fabric, again slightly larger than the cushion/padding size.
Note: If you have just a table frame (no top), then you will need to add pieces to your upholstered top to act as markers or braces to keep the upholstered top from sliding around. I used these additional pieces to attach my slats together from the bottom rather than using a jig to attach the boards side-by-side with screws. If you are using a flat-topped table, you can likely also do the same by attaching additional strips across the top, but if your cushioning isn't plush enough you make feel the additional pieces underneath you.


3a. If you have just a table frame (no top), then you will need to add pieces to your upholstered top as mentioned above. Place your table frame over top the assembled wood planks/slats or plywood, trace its inner outline onto your wood and then attach pieces to match and act as braces.
3b. If you have a flat-topped table... carry on to step 4!
3b. If you have a flat-topped table... carry on to step 4!
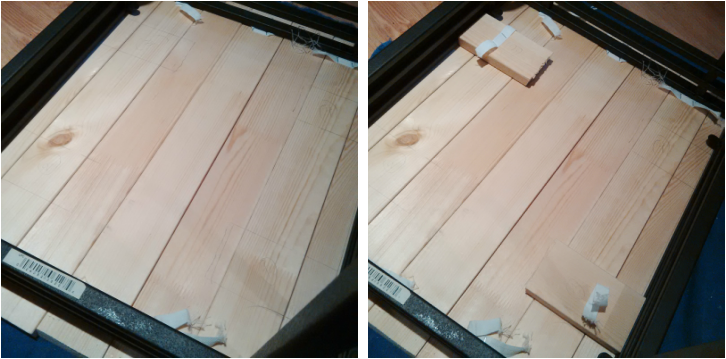
I ended up adding a total of 2 sort pieces and 2 long pieces in order to attach all of the planks and have markers for the top, bottom, and sides of the inner table frame.
Sorry! My pictures for the next few steps up and disappeared! Those rascals...
4. Now this is the actual upholstering part. These easiest way I find to do this is to place your fabric right-side down, (*then your batting if you have it*), then your cushion/padding roughly centered in the fabric, then your wood base over top that. While keeping weight on the three layers, pull the extra edge of fabric over the cushion/padding and over the edge of the wood base. This helps to make sure that the fabric is pulled snugly across the cushioning to give that nice smooth look and pull the extra cushioning up and over the wood base as well.
5. Staple the fabric in place all around the wooden base, trying to maintain an even strength with your pull to keep the pattern of your fabric (if there is one) straight/centered and to keep the tension of the upholstered top even.
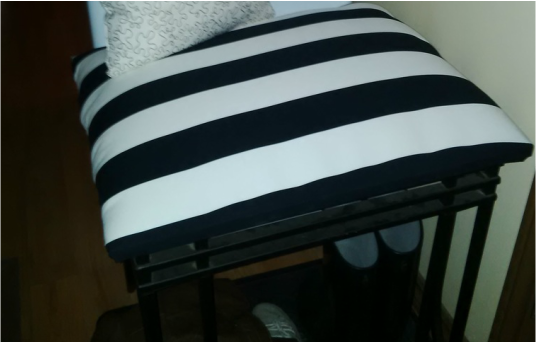
6. Trim any significantly excess fabric. Your upholstered top is done!
7. To attach your upholstered top the the table frame, simply slip it into place so that the wood braces you screwed in early fit snugly within the inner frame. To attach your upholstered top to your flat-topped table, add wood glue to the flat-topped table and place your upholstered top over on top. Then, screw it into place from underneath.
4. Now this is the actual upholstering part. These easiest way I find to do this is to place your fabric right-side down, (*then your batting if you have it*), then your cushion/padding roughly centered in the fabric, then your wood base over top that. While keeping weight on the three layers, pull the extra edge of fabric over the cushion/padding and over the edge of the wood base. This helps to make sure that the fabric is pulled snugly across the cushioning to give that nice smooth look and pull the extra cushioning up and over the wood base as well.
5. Staple the fabric in place all around the wooden base, trying to maintain an even strength with your pull to keep the pattern of your fabric (if there is one) straight/centered and to keep the tension of the upholstered top even.
6. Trim any significantly excess fabric. Your upholstered top is done!
7. To attach your upholstered top the the table frame, simply slip it into place so that the wood braces you screwed in early fit snugly within the inner frame. To attach your upholstered top to your flat-topped table, add wood glue to the flat-topped table and place your upholstered top over on top. Then, screw it into place from underneath.
It cost me $20 for the wood slats forever ago, $7 for the fabric (I bought 1m and had enough to make an 18x18 pillow cover and a lumbar pillow cover later on), I had the screws and tools on hand, and I had the original glass side table on hand.
$27 for an upholstered metal-framed bench. Not too shabby.
$27 for an upholstered metal-framed bench. Not too shabby.
 RSS Feed

