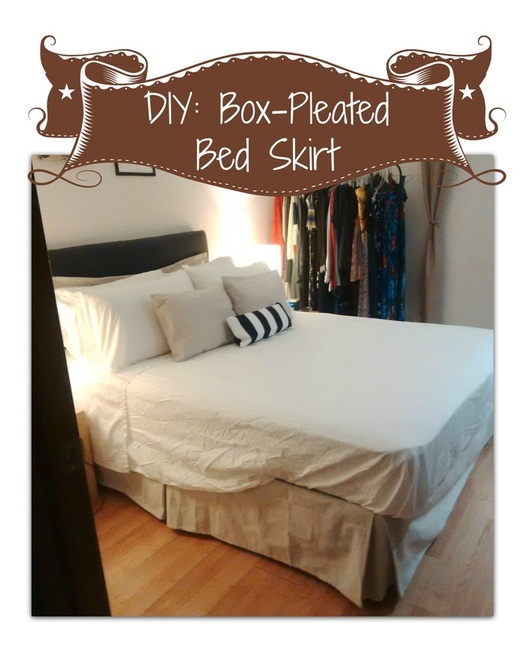
DIY: Box-Pleated Bed Skirt MADE OUT OF CANVAS DROP CLOTH!
Boom.
This entire project cost me a whopping $17 for the canvas drop cloth which (by the way) also made me 4 placemats, a small table runner, and still gives me enough material to make a few canvas bags or pillow covers.
Yup. It's pretty awesome. I love canvas and burlap because they are sturdy, yet their colours are richly natural and so perfectly neutral.
But enough about what I love (like, really, who cares?) and onto the tutorial!
note: if you are not lazy (unlike me) you will iron your beauty before presenting it to the public!
Materials
Methods
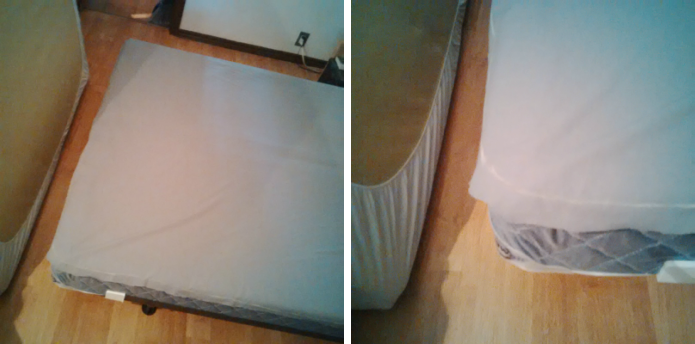
1. Measure out your boxspring and the height from the floor to the top of your boxspring. My bed is a Queen which measured at 60in x 78in with a height of 14in from the floor.
2. Cut your fabric or flat sheet out in the dimensions of the boxspring + 1in on each measurement (for me that was 61in x 79in). I find the flat sheet easier because fabric will need to be stitched together to create a wide enough sheet. Finish the edges of the cut-to-size sheet to prevent fraying. Place the cut-to-size sheet on the boxspring "right side down" (if you have a right side), then trace the rounded corners and cut them out. This will help create a smooth finish that hugs the box spring at the corners.
3. Mark the centre of each long side and each corner of the cut-to-size sheet with a pin or chalk.
- Fabric for your bed skirt
- Fabric or a flat shit to fit over your boxspring
- Sewing Machine
- Pins
- More Pins
- No seriously, get more pins
Methods
1. Measure out your boxspring and the height from the floor to the top of your boxspring. My bed is a Queen which measured at 60in x 78in with a height of 14in from the floor.
2. Cut your fabric or flat sheet out in the dimensions of the boxspring + 1in on each measurement (for me that was 61in x 79in). I find the flat sheet easier because fabric will need to be stitched together to create a wide enough sheet. Finish the edges of the cut-to-size sheet to prevent fraying. Place the cut-to-size sheet on the boxspring "right side down" (if you have a right side), then trace the rounded corners and cut them out. This will help create a smooth finish that hugs the box spring at the corners.
3. Mark the centre of each long side and each corner of the cut-to-size sheet with a pin or chalk.
3. Calculate the length of fabric needed for your bed skirt.
*For my bed skirt I made 6in wide box pleats, so my numbers below will reflect that.*
Long pieces: 78in [boxspring length] + 12in [to create my 6in box pleat] + 6in [for half of the corner pleat] + 1.5in [for the finished hem on the head-side of the bedskirt and the seam with the short edge at the foot of the boxspring]
= 97.5in of fabric PER LONG SIDE.
Short piece: 60in [boxpring width] + 6in [to create half of the corner pleat on one side] + 6 in [to create half of the corner pleat on the other side] + 1in [for the two seams with the two long edges]
= 72in of fabric

4. Hem the head-side of the long strips of fabric (really, pick whichever side you want and declare it to be the head of the bed henceforth).
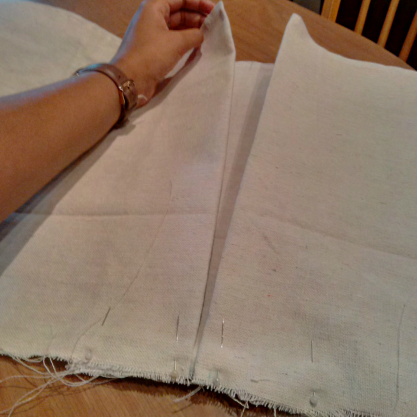
5. Mark the middle of each long strip of fabric with a pin or chalk. Measure out and mark 6in to the left and 6in to the right of this original mark.
5. Mark the middle of each long strip of fabric with a pin or chalk. Measure out and mark 6in to the left and 6in to the right of this original mark.

The blue mark to the right is the right-most mark. The centre pink mark is the mid-point of my fabric. The pink mark to the left is the left-most mark.
6. At these 6in marks, fold the fabric. Bring these folds into the centre mark, press in place, and pin to create your first box pleat.
7. Repeat for the second long piece of fabric.
8. Pin the short piece of fabric to the unfinished side of on of the long strips of fabric, right sides together. Sew with a 0.5in margin to create a seam. Repeat with the second long strip of fabric to create one long strip. Finish the edges (I always use a zig-zag stitch) and trim the fabric.
8. Pin the short piece of fabric to the unfinished side of on of the long strips of fabric, right sides together. Sew with a 0.5in margin to create a seam. Repeat with the second long strip of fabric to create one long strip. Finish the edges (I always use a zig-zag stitch) and trim the fabric.
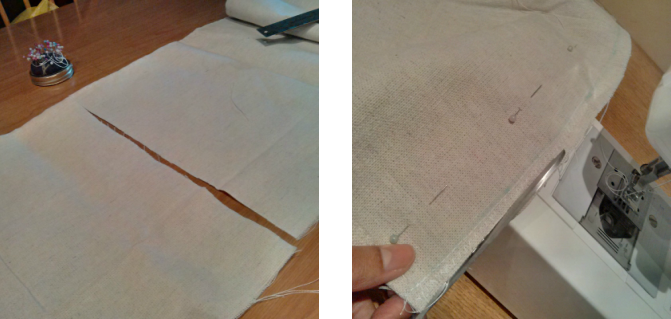
9. Using the seam as your middle mark, measure out and mark 6in to the left and 6in to the right of the seam. Again, fold the fabric at these 6in marks and bring these folds into the centre mark, press in place, and pin to create your final two box pleats.
10. Bring your pinned strip of fabric to your bed and the cut-to-size sheet laying atop your boxspring. Place your skirt with the right side (the pleated side) to the bed. Match the centre of each box pleat to the corresponding centre marks on the cut-to-size sheet and pin in place with right sides together. So that means the box pleat on the right-most long strip of fabric matches with the middle mark on the right-most long edge of the cut-to-size sheet.
11. Make any adjustments if necessary.
12. Once all of the pleats are matched to the centre marks, begin pinning the rest of the skirt to the sheet. Make sure to pin in small stretches and to carefully use a great deal of pins at the rounded corners.


13. Bring your pinned contraption to your sewing machine and carefully stitch to create a seam. Finish the edges to prevent fraying..
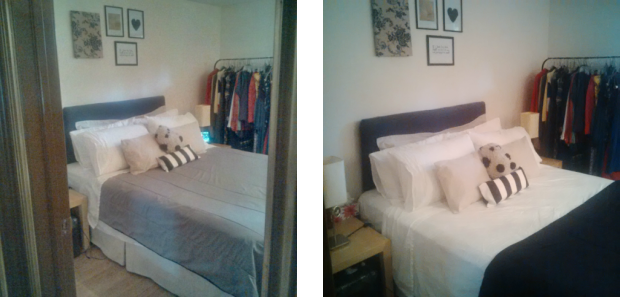
14. Fit it to your bed, marvel at how that somehow worked, and throw your mattress over top!
* I pinned the top of my bed skirt to the top of the box spring to make sure that it didn't go flying when I tossed (literally) my mattress on top of it. Not sure if it actually helped, but it made me feel better! *
* I pinned the top of my bed skirt to the top of the box spring to make sure that it didn't go flying when I tossed (literally) my mattress on top of it. Not sure if it actually helped, but it made me feel better! *


Have I mentioned how much I appreciate the diversity provided by a reversible comforter?
***Note: I created my bed skirt without a centre pleat at the foot of the bed. I prefer for the foot of the bed to be smooth and unbroken, however creating a pleat here would be very easy. Just add an additional 12in to your short strip of fabric measurement, mark the strip's centre, and repeat the steps to create a box pleat here.***
 RSS Feed

